xmh has a long list of action procedures that it runs when you click a mouse button, select a command from a menu, or click a button in a window. These are set in your system's Xmh resource file. You can change the way xmh works by adding entries to your own resource file (like .Xdefaults). For more information, see O'Reilly & Associates' Volume Four, X Toolkit Intrinsics Programming Manual, Chapter 8, Events, Translations, and Accelerators.
The Table below is an alphabetical list of xmh actions. For a list grouped by function, with longer descriptions, see the section called PROCESSING YOUR MAIL in the xmh(1) manual page.
Let's add an accelerator for Compose Message.
The Example below shows the section of the online Xmh resource file that sets accelerators for commands on the Message menu:
Example: Default message menu accelerators
*messageMenu.Accelerators: #override\n\
	 Meta<Key>space: XmhViewNextMessage()\n\
	:Meta<Key>c:    XmhMarkCopy()\n\
	:Meta<Key>d:    XmhMarkDelete()\n\
	:Meta<Key>f:    XmhForward()\n\
	:Meta<Key>m:    XmhMarkMove()\n\
	:Meta<Key>n:    XmhViewNextMessage()\n\
	:Meta<Key>p:    XmhViewPreviousMessage()\n\
	:Meta<Key>r:    XmhReply()\n\
	:Meta<Key>u:    XmhUnmark()\n
The first line has the name of the resource, *messageMenu.Accelerators. The other lines have entries in pairs, one pair per accelerator. Because each line except the last one ends with a backslash (\) (which is the line continuation character), all of these are part of the same resource entry.
For example, the third line defines the META-C accelerator. When you type META-C, that executes the XmhMarkCopy() action, which marks the selected messages for linking ("copying").
As the Table xmh Release 5 Actions shows, the action for composing a new message is XmhComposeMessage(). You'll want to pick an accelerator key that's not already used. Look through the list in the xmh manual page. Let's say that you choose META-SHIFT-M. You'll need to add a new accelerator/action pair to the resource list.
The order of the accelerators in a resource list doesn't matter. Let's add the new entry at the end. Copy all ten lines of the entry into your resource file (like .Xdefaults) and add a new pair for your new accelerator. I added a continuation character (a backslash (\)) to the end of the last existing line in the previous Example. Then I added the new META-SHIFT-M accelerator on a new line below it. The new lines in the resource file are shown in the next Example:
Example: Message menu accelerators with new ComposeMessage()
*messageMenu.Accelerators: #override\n\
	 Meta<Key>space: XmhViewNextMessage()\n\
	:Meta<Key>c:    XmhMarkCopy()\n\
	:Meta<Key>d:    XmhMarkDelete()\n\
	:Meta<Key>f:    XmhForward()\n\
	:Meta<Key>m:    XmhMarkMove()\n\
	:Meta<Key>n:    XmhViewNextMessage()\n\
	:Meta<Key>p:    XmhViewPreviousMessage()\n\
	:Meta<Key>r:    XmhReply()\n\
	:Meta<Key>u:    XmhUnmark()\n\
	:Meta<Key>M:    XmhComposeMessage()\n
Restarting xmh will bring in this new accelerator. Try it: type META-SHIFT-M and a composition window should open.
Accelerator to Send Draft and Close Window
This one defines META-S to send the draft and close the window. It uses two xmh actions. Add the following to your resource file:
Xmh*comp.translations: #override\n\
        :Meta<Key>s:           XmhSend()XmhCloseView()\n
As you can see, to get more than one action from an accelerator,
just list the actions one after the other.
This was taken from the Xmh.sample file in the X directory tree -- see
that file
for many more examples.
Redefine New Headers Button to be Send and Close
The new META-S accelerator in the previous section speeds up a common thing you do from a composition window: send the draft and close the window. Next, let's see how to redefine a much less used button, New Headers, and make the button Send and Close instead.
Here are the two new resource entries for your resource file:
xmh*compButtons.reset.Translations: #override\n\
	<Btn1Down>,<Btn1Up>: XmhSend()XmhCloseView()unset()\n
xmh*compButtons.reset.label: Send and Close
Those entries do two things:
Figure: Default composition window buttonbox
![]()
Figure: Composition window New Headers changed to Send and Close
![]()
If you still would like the New Headers button, you can replace the Compose Message button with a New Headers button. I've always thought that New Headers was a misleading name because it removes all changes, not just the header. So I'll also rename New Headers to Start Over. Here are the new resource file entries (they work the same way as the button redefinitions above, but they redefine the fourth button, .compose):
xmh*compButtons.compose.Translations: #override\n\
	<Btn1Down>,<Btn1Up>: XmhResetCompose()unset()\n
xmh*compButtons.compose.label: Start Over
After that redefinition, the composition window buttonbox looks like the Figure below.
Figure: Composition window with two buttons redefined
![]()
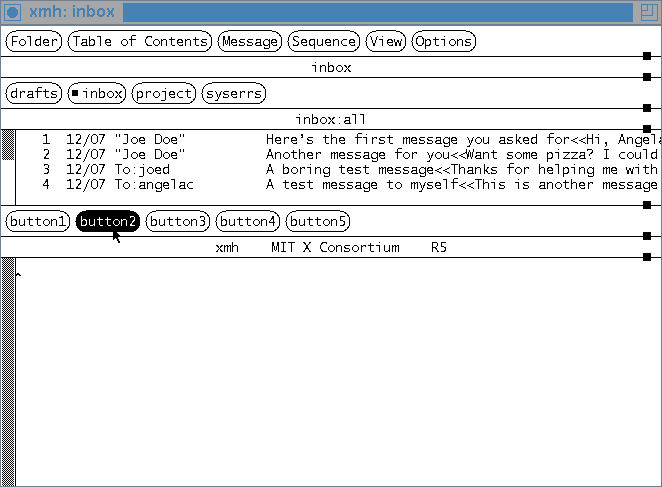
The Figure below is an example of an uncustomized display.
Figure: Display (not customized yet) with *CommandButtonCount:5

It's made with this single resource file entry:
Xmh*CommandButtonCount:5The default CommandButtonCount is 0, which gives no buttonbox. Now let's fill in the buttonbox. If you're an MH user, too, you may want buttons labeled with the MH command equivalents. If you know those names, this is a good way to get a lot of use out of a small area on the main window. (I like these buttons because sometimes I forget the accelerators.)
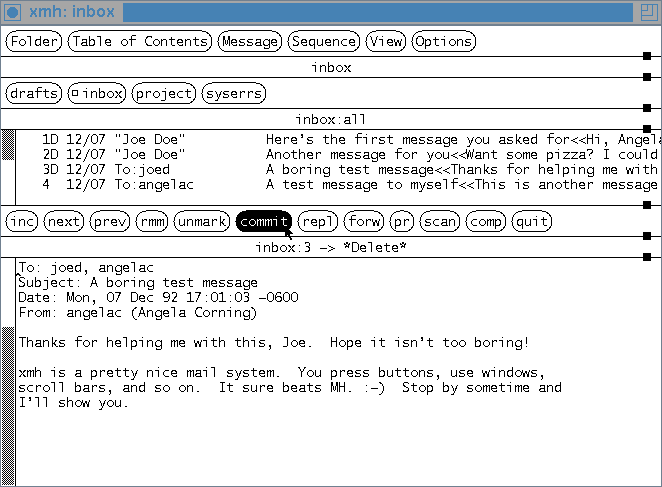
After you add entries for the buttons to your resource file, your main windows will look like the Figure after the Example.
Once you see the pattern, the buttons are easy to figure out yourself.
This next Example shows the parts of the resource file entries for the first and fourth buttons. Putting an exclamation point (!) at the start of a line makes it a comment.
Example: Defining two of the new command buttons
!
!# define the number of buttons in the buttonbox
!
Xmh*CommandButtonCount: 12
!
!# 1: left mouse button:                "inc" MH command
!
Xmh*commandBox.button1.label:   inc
Xmh*commandBox.button1.translations:    #override\n\
	<Btn1Down>,<Btn1Up>: XmhIncorporateNewMail()unset()
	...
!
!# 4: left or right mouse buttons:      "rmm" MH command
!
Xmh*commandBox.button4.label:   rmm
Xmh*commandBox.button4.translations:    #override\n\
	<Btn1Down>,<Btn1Up>: XmhMarkDelete()unset()\n\
	<Btn3Down>,<Btn3Up>: XmhMarkDelete()unset()
Figure: Main window with new buttonbox

Notice that the fourth button in the buttonbox can be activated with either the first or the third mouse button.
xmh*commandBox.button1.foreground: yellow
xmh*commandBox.button1.background: navy
xmh*commandBox.button12.foreground: navy
xmh*commandBox.button12.background: red
Using color is a nice way to group related buttons.
xmh*commandButtonCount: 1
xmh*commandBox.button1.label: Move to todo/June
xmh*commandBox.button1.translations: #override\n\
	<Btn1Down>,<Btn1Up>: set() XmhPushFolder()\
	XmhPushFolder(todo/June) XmhPopFolder()\
	XmhMarkMove() XmhPopFolder() unset()
Before xmh introduced the XmhShellCommand() action in Release 5, the only way to change MH profile options was with a text editor. Now you can define buttons that call a shell script named edprofile -- and edit your MH profile from a main xmh window.
The details of setting up edprofile are below. The Section A New Buttonbox for the Main Windows shows how to add new buttons to the main window. The Example below has the lines to put in your resource file for making two buttons that change scan.
Example: Changing sort order with edprofile
Xmh*CommandButtonCount: 2
Xmh*commandBox.button1.label: default toc
Xmh*commandBox.button1.translations: #override\
  <Btn1Down>,<Btn1Up>: XmhShellCommand(edprofile -v scan --) unset()
Xmh*commandBox.button2.label: size toc
Xmh*commandBox.button2.translations: #override\
  <Btn1Down>,<Btn1Up>: XmhShellCommand(edprofile scan -form scan.size --) unset()
The first button, labeled size toc, adds the size of each message to the Table of Contents the next time the folder is rescanned. (The Section scan Format Files explains and shows examples of this.) The button runs the command:
edprofile scan -form scan.size --that changes the MH profile scan entry to look like this:
scan: -form scan.sizeAny switches on that MH profile scan entry before edprofile runs are deleted.
The second button, labeled default toc, will run the command:
edprofile -v scanThe scan entry in the MH profile will be changed to this:
scan:The next time a folder is rescanned, it will have the default format.
Unfortunately, there must be a current or selected message before you run XmhShellComand(). If there's not a message selected, choose any one before you click the button that runs edprofile.
NOTE: edprofile only works with the Release 5 and beyond; these versions have the xmhShellCommand() action.
The command-line syntax of edprofile is:
edprofile [-v] entry [new-value] --Brackets, like [-v], mean that part isn't required. The parts are:
If you don't give a value, edprofile leaves an empty entry (just the name) in the MH profile. Then xmh will use the MH default action of the MH command.
This program is described in the Section Explanation of edprofile.
Example: Button to edit a message with vi
Xmh*CommandButtonCount: 1
Xmh*commandBox.button1.label: edit vi
Xmh*commandBox.button1.translations: #override\
  <Btn1Down>,<Btn1Up>: XmhShellCommand(xterm -e vi) unset()
The button runs vi in an xterm window; it gives vi the full pathname of the message(s) you select. When you exit vi, the window will close. It's clumsy, but it works. The steps to use the button are:
You can use this same technique to run spell-checking programs or any other UNIX program to help you edit.
[Table of Contents] [Index] [Previous: Changing How Commands Work] [Next: Conflicts Between xmh and MH Customization]
This file is from the third edition of the book MH & xmh: Email for Users & Programmers, ISBN 1-56592-093-7, by Jerry Peek. Copyright © 1991, 1992, 1995 by O'Reilly & Associates, Inc. This file is freely-available; you can redistribute it and/or modify it under the terms of the GNU General Public License as published by the Free Software Foundation. For more information, see the file copying.htm.
Suggestions are welcome: Jerry Peek <jerry@ora.com>
HIVE: All information for read only. Please respect copyright! |

